
Phase Contrast Microscopy
Click here to see an overview of Phase Contrast microscopy.
Click here to learn the optical theory of Phase Contrast microscopy.
Click here to learn about setting up for Phase Contrast microscopy.
Click here to learn about Phase Contrast artifacts.
Click here to learn about Relief Phase Contrast microscopy.
Click here to see a PDF describing proper setup of phase contrast on the Olympus BH2.
What Is Phase Contrast?
The technique of Phase Contrast microscopy, which was developed in the 1930s by Dutch physicist Frits Zernike, had become broadly used within the scientific community by 1942. Zernike was awarded the 1953 Nobel Prize in Physics for his work on Phase Contrast.
Phase Contrast is a technique of optical staining which uses phase differences between the background illumination and the light waves passing through the specimen to add visible contrast to specimens which otherwise lack sufficient inherent optical contrast for conventional brightfield observation. While Phase Contrast microscopy is most often used for studying live, unstained specimens (since live specimens cannot typically be stained without affecting their behavior, vitality, or even killing the specimens outright), it also finds applications for non-living specimens which, for whatever reason, lack sufficient optical contrast for direct brightfield observation. For some specimens, Phase Contrast can provide significantly increased contrast as compared to conventional brightfield microscopy.
So, what should you know about Phase Contrast? Phase Contrast optics exaggerate the differences in the phase relationships between the light waves in the background illumination and the light waves passing through the specimen, so that they can constructively or de-constructively interfere with each other, thereby converting invisible phase differences into visible image contrast. That’s it, in a nutshell.
Theory of Phase Contrast
For those wishing a deeper understanding, a more technical answer is presented here. The visible image in a microscope is formed by wave interference at the intermediate image plane of the microscope. Specifically, the background illumination (i.e., that which does not pass through the specimen) and the diffracted light that passes through the specimen interfere to form the visible image. By convention, the background illumination is referred to as the “S-wave”, or surround wave, and the diffracted light which passes through the specimen is referred to as the “D-wave”, or diffracted wave.
The reason the specimen is visible at all to the observer is because of the diffraction, absorption, and phase shifting that occurs as the D-wavefront passes through the specimen under observation. Diffraction occurs as a result of fine detail within the specimen, absorption occurs when portions of the specimen are not completely transparent, and phase shifting occurs as a result of differences in the refractive index of portions of the specimen, as compared to the surrounding refractive indices. These factors combine to form the visible image when the S-wave and D-wave interfere at the intermediate image plane.
When viewing live, unstained specimens in conventional brightfield, the specimen is often difficult to see since light absorption can be minimal and since the constructive/destructive interference that occurs as a result of the phase-shifted D-wavefront can be minimal as well. This is where Phase Contrast comes into the picture.
Phase Contrast utilizes special optics within the condenser and objectives to accomplish two things: 1) Decrease the amplitude of the background S-wave so that the intensity of the diffracted D-wave will not be swamped by excessively bright background lighting. 2) Phase shift the background S-wave by a quarter wavelength, thereby exaggerating the constructive or destructive interference that occurs between the S-wave and D-wave. The result of these two things is that images of live, unstained specimens have significantly higher contrast than could otherwise be obtained with conventional brightfield methods.
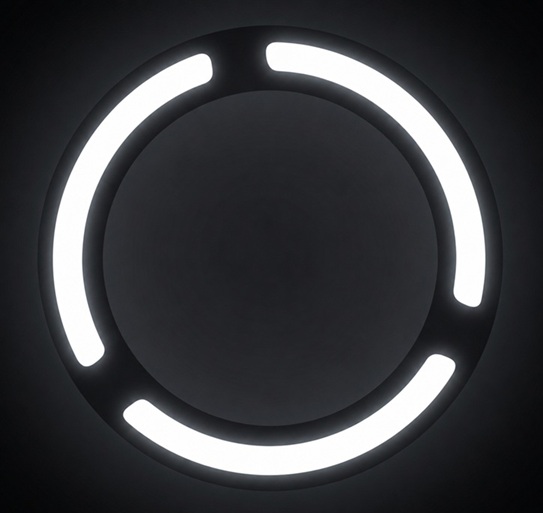
In order to accomplish the two things listed above, both the condenser and objectives must be modified from the conventional brightfield configuration to obtain Phase Contrast. The Phase Contrast condenser includes a ring-shaped “phase annulus” positioned within the optical path, in place of the normal iris diaphragm. This phase annulus allows the condenser to provide the requisite narrow, hollow cone of illumination needed by the Phase Contrast objectives. This hollow cone is similar to that used in darkfield, but it differs in that only the central region of the cone is blocked for darkfield (while everything outside this region is allowed to pass), while in Phase Contrast, the ring-shaped phase annulus blocks both the central and outer regions, allowing only a thin, funnel shaped cone of light to reach the objectives.
Phase Contrast objectives include a ring-shaped neutral-density/phase-modifying optical element, known as the “phase ring”. The phase ring attenuates the amplitude and provides a quarter-wave phase shift to all light passing through the ring. When Phase Contrast optics are properly set up, and when no specimen is in the optical path, all of the light from the condenser passes through the phase ring in the objective, and is visible as background light. This happens because, with no specimen in the optical path, there is no diffraction to cause any of the light to fall outside the phase ring.
Phase Contrast objectives are available in two basic types: Positive and Negative. In Positive Phase Contrast, the phase ring within the objective advances the S-wavefront by a quarter wavelength, relative to the D-wavefront. In Negative Phase Contrast, the phase ring retards the S-wavefront by a quarter wavelength, relative to the D-wavefront.
Let’s now examine what happens when a specimen is placed in the optical path. The phase of the D-wavefront passing through the specimen is retarded by areas of the specimen which have a higher refractive index than the surrounding medium, and advanced by the areas of the specimen which have a lower refractive index than the surrounding medium. In Positive Phase Contrast, the advanced S-wave and the retarded D-wave destructively interfere, resulting in the areas of the specimen that have a higher refractive index than the surrounding medium appearing darker than the neutral gray background. In Negative Phase Contrast, the exact opposite occurs. The retarded S-wave and the retarded D-wave constructively interfere, resulting in the areas of the specimen that have a higher refractive index than the surrounding medium appearing lighter than the neutral gray background.
How Do I Set Up and Use Phase Contrast?
Assuming you have accumulated all the components necessary for Phase Contrast, how do you go about setting it all up? The following procedure is written for the Olympus BH2 series of microscopes and assumes you will be using a Zernike-style condenser, but the general procedure is applicable to other scopes as well.
- Install the phase contrast the condenser and objectives on your microscope.
- Rotate the dial on the condenser until the number “0” (for brightfield) is visible on the front and is clicked into position.
- Set the condenser diaphragm to its approximate center position.
- Rotate the nosepiece to select the 10x objective.
- Place a slide with a suitable specimen on the stage.
- Set up the microscope in the traditional way for Köhler illumination, making sure to carefully center the condenser.
- You should now see a brightfield image of your specimen.
- Remove the slide from the microscope stage.
- Rotate the condenser selector disk to the “10” position and make sure that it clicks into position.
- Replace the right eyepiece with a phase centering telescope and look into the telescope.
- If the telescope is set for proper focus, you will see a dark and a bright ring in the visible field.
- If the focus is off, rotate the focusing ring on the centering telescope until the bright and dark rings are sharply focused.
- Depress the two orthogonal centering controls so that they engage the internal centering screws for the annulus and adjust the centering controls until the bright ring falls completely within the dark ring.
- Once the centering adjustment has been performed for the 10x annulus, release the centering controls and allow them to return to their extended positions.
- Repeat this same centering procedure for the remaining phase contrast objectives, making sure to match the number on the condenser selector dial with the magnification of the objectives.
- Replace the phase centering telescope with the eyepiece.
- Place a green phase contrast filter into the filter receptacle below the condenser.
- Place a slide with a suitable thin and transparent specimen on the stage.
You are now set up for Phase Contrast viewing. Note that it may be necessary to increase the lighting intensity at this time, since only a portion of the light that is present in brightfield will be available in Phase Contrast.
Phase Contrast Artifacts
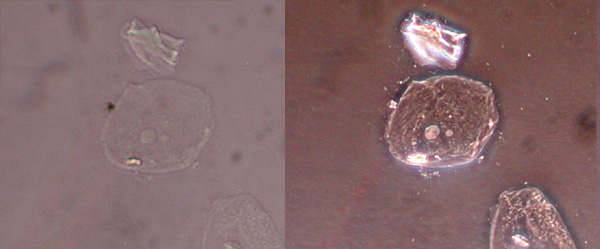
“Why are there halos around everything when I use Phase Contrast?” Ah yes, the inevitable artifacts of Phase Contrast! These artifacts can make it difficult to accurately interpret the results of Phase Contrast images, especially on poorly prepared or unsuitable specimens. The halos you are seeing are caused by some of the diffracted light that transmits through the specimen passing through the phase ring within the objective, along with un-diffracted background light. Ideally, only the un-diffracted background light should pass through the phase ring, and only diffracted light should pass through the areas inside and outside the phase ring. But the real world is messy, and this is just a fact of life when using Phase Contrast. In Positive Phase Contrast (PL or PLL), this effect causes the edges of large objects to have a bright edge, whereas in Negative Phase Contrast (NM or NH), this effect causes them to have a dark edge.
Another Phase Contrast artifact is known as the shade-off effect. In this case, the homogeneous parts of the image show up at the same brightness level as the background (i.e., the surrounding medium). This occurs because although the light experiences a phase shift as it passes through these regions of the specimen, only minimal diffraction occurs and the angle it scatters is therefore limited, causing it to pass through the phase ring in the objective and therefore not experience the desired degree of interference.
A third Phase Contrast artifact is known as contrast inversion. In the case of Positive Phase Contrast, objects with a high index of refraction situated next to objects with a low index of refraction will appear brighter than the background, instead of darker. This happens because in these cases the phase shift is not the usual quarter wave that should occur, and instead of the expected destructive interference occurring, constructive interference occurs instead. The opposite of this is true for Negative Phase Contrast.
What is Relief Phase Contrast Microscopy?
Relief Phase Contrast is version of Phase Contrast microscopy using oblique illumination. In conventional Phase Contrast microscopy, the light in the condenser passes through a the phase annulus within the condenser to produce a thin, hollow cone of light. The system is carefully aligned such that this thin cone of light lands within the phase ring at the rear focal plane of the objective lens (when there is no specimen in the optical path). In Relief Phase Contrast, rather than using the full ring-like aperture, only a partial segment of this ring is open in the condenser, thereby producing offset, oblique lighting from a partial, hollow cone of light. Additionally, the phase rings within Relief Phase Contrast objectives are a bit different than in conventional phase contrast objectives, to produce images with reduced halos and enhanced shadowing. Olympus offered Relief Phase Contrast on their CK series of inverted microscopes.